# Zephyr for Jira Cloud Integration
In this article, we will look at, how we can integrate Zephyr for Jira Cloud with vREST NG. This integration saves a lot of manual effort in updating the test status in the test case management tool Zephyr.
Table of Contents:
# How this integration works?
Let's briefly look at, how this integration actually works:
- First you will need to map vREST NG tests with Zephyr-Jira tests via the
External Idfield in the vREST NG application. - Then you may import the desired built-in template for this integration.
- This import process adds some
Post Test Case Iteration Hookswhich will be executed for each test case execution. - And it will update the execution status of the vREST NG test in the mapped Zephyr test case.
Now, let's see the step-by-step instructions on how you may integrate Zephyr with vREST NG Application.
# Step 1: Map vREST NG Tests with Zephyr Tests
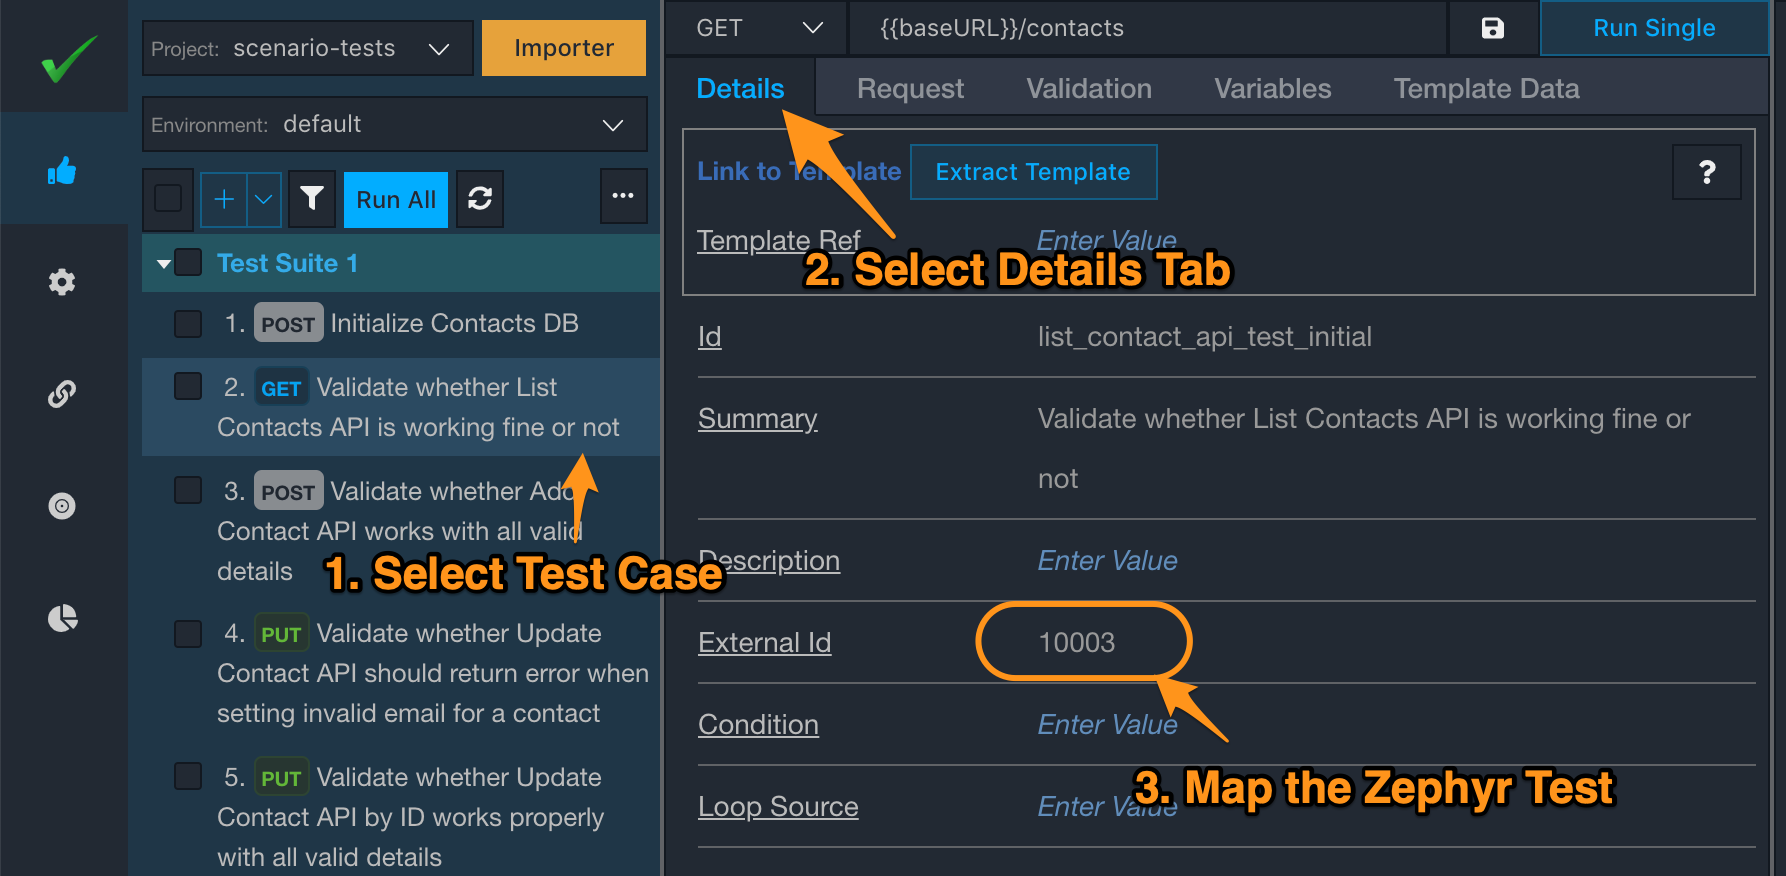
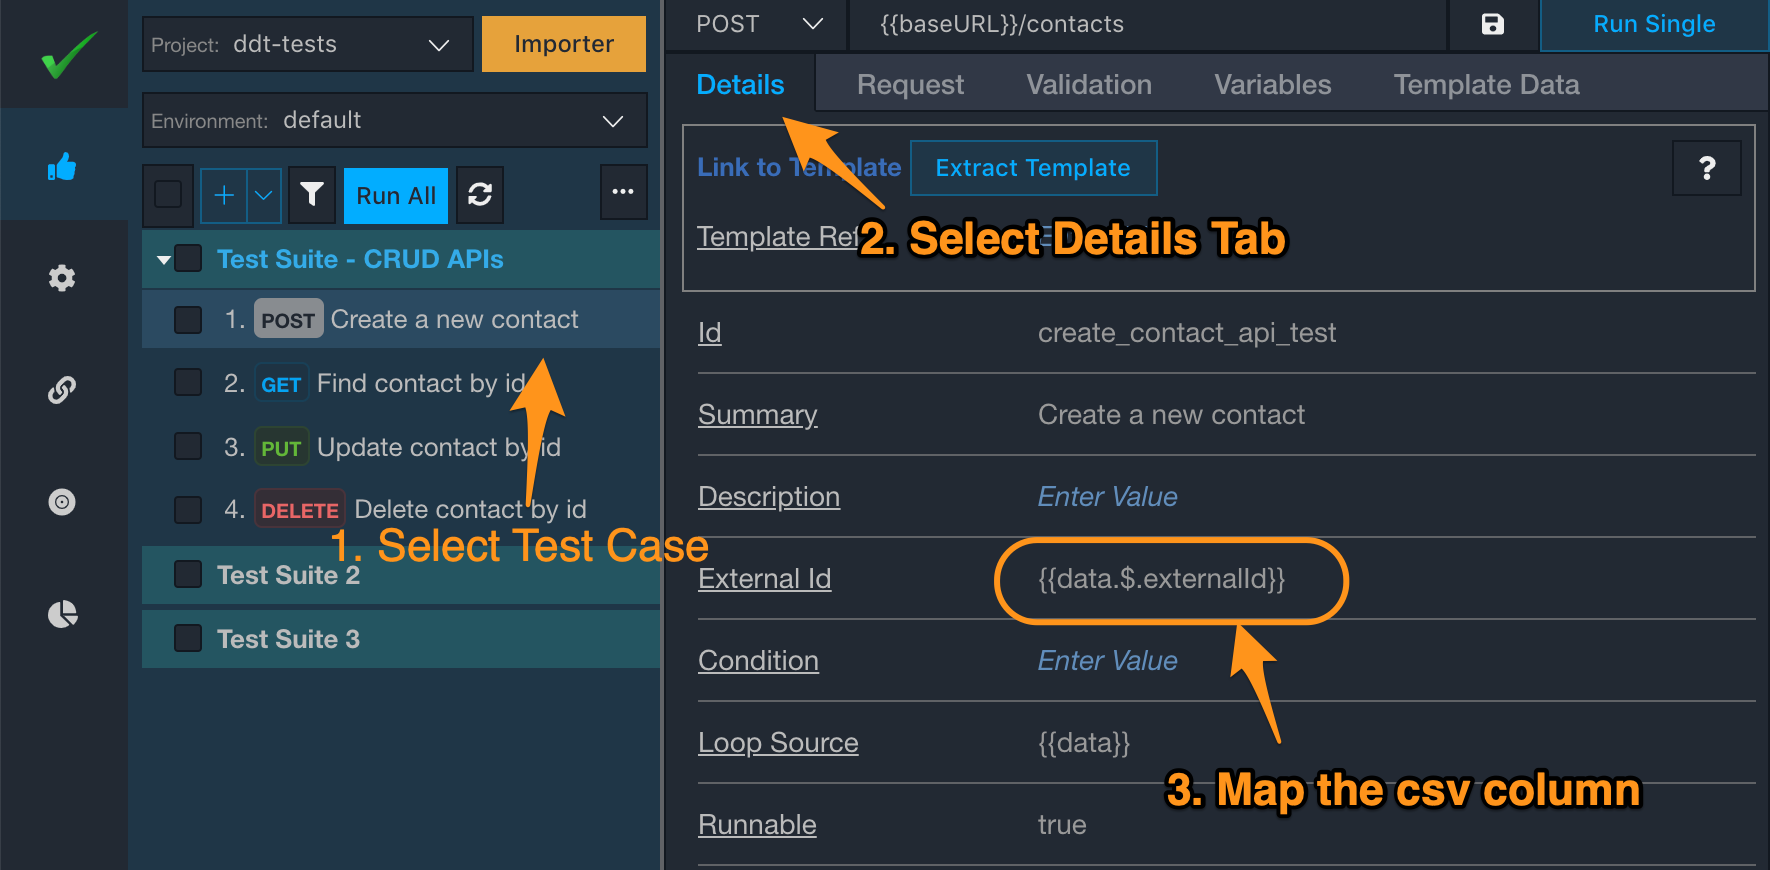
First, you will need to map vREST NG tests with Zephyr Tests. It is not required to map every vREST NG test case. For mapping, simply select the test case in the vREST NG application which you would like to map with Zephyr Test Case. And visit the Details tab of the test case.
For a normal test, you may directly set the external id field as shown in the figure below:
And for a data-driven test, you may maintain the externalId column in the CSV file and you may use a variable {{data.$.externalId}} for the External Id field in vREST NG Application like this:
# Step 2: Import the Integration Template
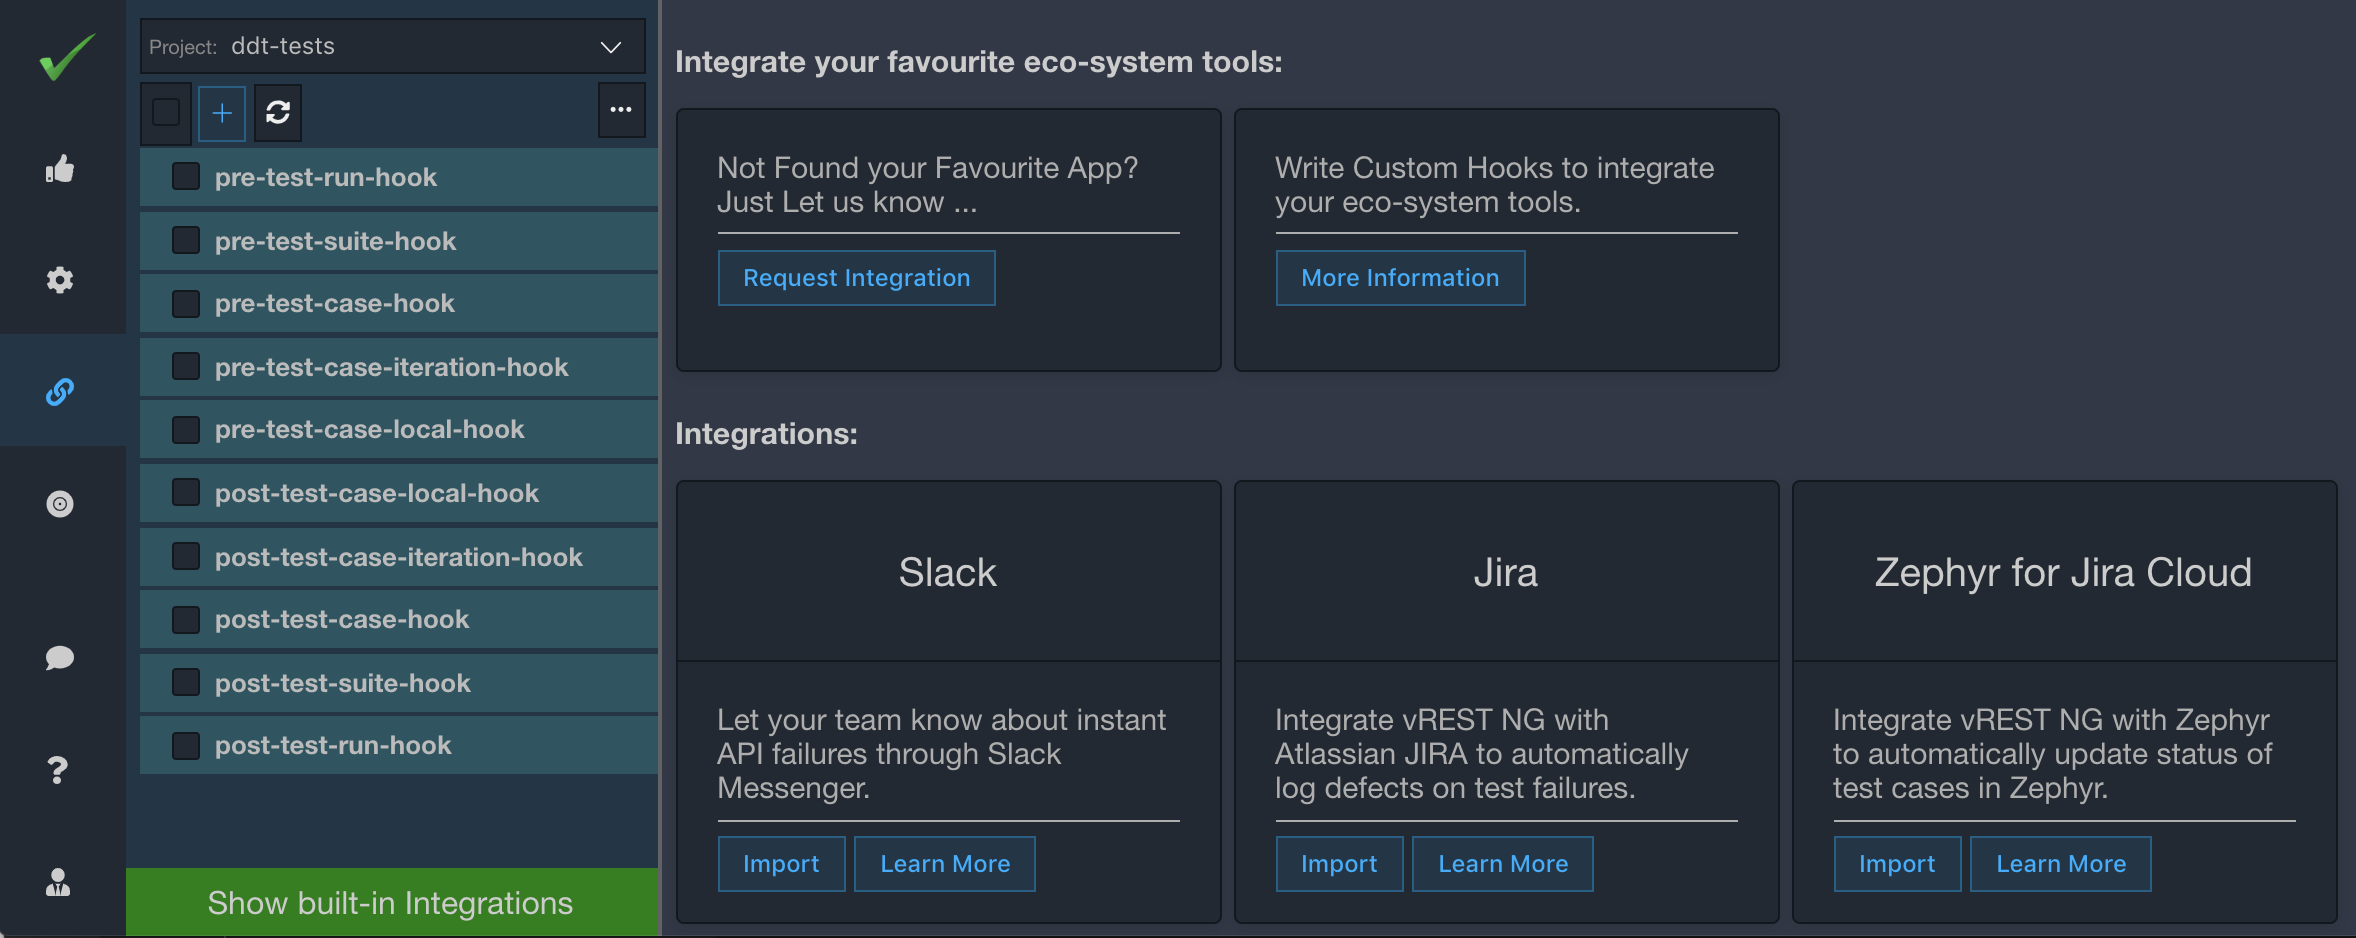
Now, just visit the Hooks tab in vREST NG Application and click on the "Show Built-in Integrations" option available at the bottom in the left pane. It will show all the available integrations. Just select the desired integration and click on the Import button.
# Step 3. Understand the data which is imported
Let's review the data which is imported by this import process. You may skip this step if you don't want to see the details. We will continuously improve our integrations based on user feedback. In this step, we will mention the impact of re-import of the integration. You may safely remove any of the integration files and re-import them. However, if you have done any customizations then you may need to do it again if you delete the files.
| File Path | Remarks |
|---|---|
/authorizations/jira_jwt_auth.json |
|
environments/default.json | This file will be updated with some integration-specific variables. If some of the variables already exist then they won't be changed. |
hooks/get_zephyr_test_execution_id_hook.json | Post Test Case Iteration Hook to retrieve the execution id for the mapped test case. If a file with this name already exists then the import process will not change the contents of this file. |
hooks/update_zephyr_test_execution_status_hook.json | Post Test Case Iteration Hook to update the status of the mapped test case in Zephyr for Jira Cloud. If a file with this name already exists then the import process will not change the contents of this file. |
utilities/generateJiraJwtToken.js | Utility Method for generating the JWT Token for Zephyr APIs. If a file with this name already exists then the import process will not change the contents of this file. |
utilities/getZephyrTestExecutionId.js | Utility Method for extracting the execution id from Zephyr API response. If a file with this name already exists then the import process will not change the contents of this file. |
utilities/getZephyrTestStatus.js | Utility Method for evaluating the test status information for Zephyr Test Case based on vREST NG Test Status. If a file with this name already exists then the import process will not change the contents of this file. |
hooks.json | Hooks file to configure the desired hooks for integration. |
package.json | This integration also depends on some external node modules, majorly atlassian-jwt. So, it adds the desired dependencies in your package.json file inside the vREST NG Project directory. If the package.json file doesn't exist then the import process will create the package.json file otherwise it will update this file. |
# Step 4: Configure the global variables
Now, just visit the Environment/Variables section in the Configuration tab and configure the following variables which the import process has just defined.
| Variable Name | Description |
|---|---|
| zephyrBaseURL | Base URL of the Zephyr for Jira Cloud API e.g. https://prod-api.zephyr4jiracloud.com/connect |
| zapiAccessKey | The ZAPI access key for your ZAPI Installation. |
| zapiSecretKey | The ZAPI secret key for your ZAPI Installation. |
| jiraProjectId | Jira Project Id in which you would like to map with this vREST NG project. Do not specify the project key here. |
| projectVersionId | Jira Project Version Id against which you are running the tests. Please don't specify the visual name of the project version here. |
| testCycleId | Test Cycle Id information. |
| jiraAccountId | Jira Account id Information. To find out the account id,
|
| zephyrForJiraCloudHookEnv | Provide the environment name in which you would like to execute this hook. For testing purposes, you may use the value default or whatever environment you are using for your local test development. |
# Step 5. Install the desired dependencies
As this integration depends on various NPM modules. So you will need to install the desired dependencies in order to make this integration work. For that purpose, simply execute the following commands on the command line:
cd /path/to/vrest/ng/project
npm install
Note: Please make sure when you execute this project in any CI/CD server then these dependencies must be installed on CI/CD server as well in order for this integration to work.
# Step 6: Customizing the hook
Although, you may customize every bit of zephyr hooks as per your needs. But specifically, you would be interested in changing the following:
- For changing the comment message format, check
Utility Methods>>getCommentForZephyrExecution.
# Step 7: Verifying the Integration
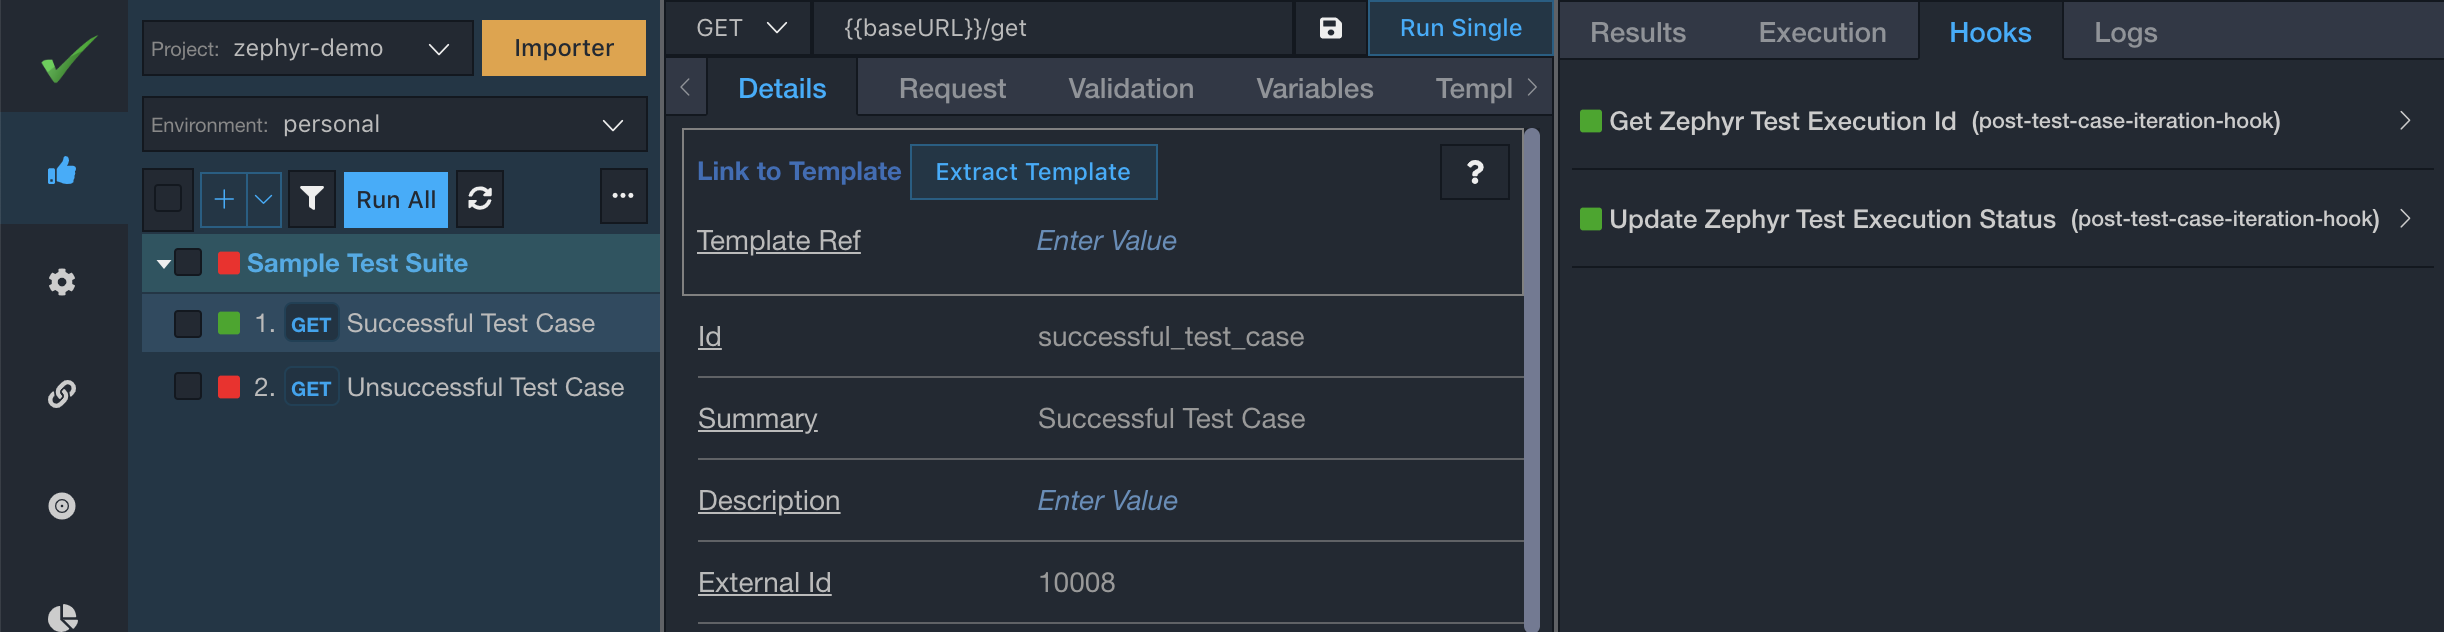
To verify the integration, simply execute some of the tests which you have mapped with the Zephyr Test. Make sure you are executing them in an environment as per the configured hook condition.
Now see the result for a mapped test case and Open the Hooks sub-tab for that test case. If you see the green signal for every zephyr hook then your integration is working. You may also verify the integration by looking at the results of tests in your Jira Cloud instance.
That's it. If you face any issues in this integration. Feel free to reach out to us at support@vrest.io.